The Atom-Probe Group

The 3D-ATOM PROBE:
A NEW TOOL FOR NANOSCALE CHARACTERISATION
Structures on a submicron scale are becoming
more and more important in high technology materials and devices. For better
characterization and better understanding of the chemical and physical
properties of solids on a nanometer scale a variety of high resolution
analytical techniques have been developed. One of those is the 3D atom-probe
which is an improved combination of the field ion microscope [1] exhibiting
atomic resolution and a time-of-flight mass spectrometer with single ion
detection efficiency. In the field ion microscope the specimen is a very
sharp needle with an average tip radius of 10 to 100 nm. If an electric
field is applied to the tip in the presence of an imaging gas (e.g. He
or Ne at 10-2 Pa) ions are created at the surface and project a highly
enlarged image of the surface onto a screen. The image resolution depends
on tip radius, temperature, image gas and netplane size. Usually for tips
with radii below 50 nm and temperatures below 80 K, a resolution of 0.3
nm can be achieved. This is just sufficient to resolve the atomic arrangement
on most surfaces. If a certain critical field is exceeded, surface atoms
or adatoms become unstable and evaporate as positive ions. Using this process
of field desorption in a well controlled manner, a chemical analysis can
be performed. During this analysis surface atoms are evaporated one by
one and analyzed in a time-of-flight mass spectrometer. The arrangement
of the time-of-flight mass spectrometer provides simultaneous detection
of all masses and a transmission close to unity. The sensitivity is only
limited by the detection efficiency of the particle detector. Operation
in a single ion counting mode leads to quantitative analysis simply by
adding up the registered particles.

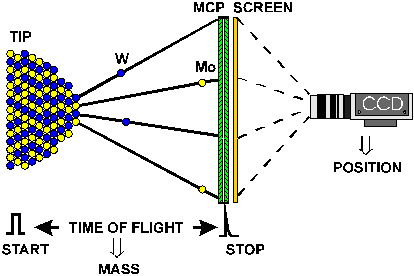
Figure 1: Basic principle of the 3D atom probe
(imaging atom probe with optical position recording)
Figure 1 shows the basic principle of the
optical 3D atom probe. The essential part of the instrument is the specimen
tip. On the imaging detector (chevron channel plate with phosphorus screen)
a direct image of the surface can be obtained. Time-of-flight measurement
of pulse-desorbed individual ions provides the information about the mass.
From the recorded light pulse by means of the CCD-camera the position of
the desorbed species can be obtained. From the information of position
and mass of the individual species a three dimensional reconstruction of
the volume analysed can be obtained with nearly atomic resolution laterally
and true atomic resolution into depth.
More
Details
REFERENCES:
[1] Miller M K, Cerezo A, Hetherington M G,
Smith G D W, Atom Probe Field ion Microscopy, Clarendon Press, Oxford,
1996
 back to the FIM-Group Home Page.
